An implementation of SurfaceView that uses the dedicated surface for displaying OpenGL rendering.
OpenGL 렌더링을 보여주는 전용 surface를 사용하기 위한 SurfaceView의 구현 클래스입니다.
A GLSurfaceView provides the following features:
GLSurfaceView는 다음과 같은 기능을 제공합니다:
Manages a surface, which is a special piece of memory that can be composited into the Android view system. 안드로이드 뷰 시스템에 합성될 수 있는 특정한 메모리의 부분인 surface를 관리합니다.
Manages an EGL display, which enables OpenGL to render into a surface. 표면에 OpenGL이 그려줄 수 있도록 하는 EGL display를 관리합니다.
Accepts a user-provided Renderer object that does the actual rendering. 렌더링에 사용되는 사용자 제공 렌더러 객체를 사용할 수 있습니다.
Renders on a dedicated thread to decouple rendering performance from the UI thread. UI스레드와 상관없이 작동하기 위해 전용 스레드로 렌터링합니다.
Supports both on-demand and continuous rendering. 지속적으로 작동하는 렌더링과 사용자가 요청했을때 그려주는 것을 모두 지원합니다.
Optionally wraps, traces, and/or error-checks the renderer's OpenGL calls. 옵션, 렌터러의 OpenGL 호출을 래핑하거나, 추적, 에러확인할 수 있습니다.
Using GLSurfaceView
GLSurfaceView 사용하기
Typically you use GLSurfaceView by subclassing it and overriding one or more of the View system input event methods.
일반적으로 GLSurfaseView를 상속받아 서브 클래스를 만들고 하나 이상의 view 시스템 입력 이벤트 메소드를 재정의하여 사용합니다.
If your application does not need to override event methods then GLSurfaceView can be used as-is.
만약 이벤트 메소드의 재정의가 필요하지 않다면, GLSurfaceView를 그대로 사용할 수 있습니다.
For the most part GLSurfaceView behavior is customized by calling "set" methods rather than by subclassing.
대부분 GLSurfaceView의 동작은 상속받아 만들지 않고 set메소드를 사용해 사용자 정의 됩니다.
Copyright (c) 2014 Google Inc. All rights reserved.
구글에게 저작권이 있습니다..
The Google Play Games plugin for Unity® is an open-source project whose goal is to provide a plugin that allows game developers to integrate with the Google Play Games API from a game written in Unity®.
이 유니티용 구글 플레이 게임 플러그인은 오픈소스 프로젝트다. 프로젝트의 목적은 플러그인 제공입니다. 플러그인은 게임 개발자가 유니티로 작성한 게임에 구글 플레이 게임즈 API를 통합할 수 있게합니다.
However, this project is not in any way endorsed or supervised by Unity Technologies.
그러나, 이 프로젝트는 어떤식으로든 유니티로부터 관리되거나 지원되지 않습니다.
Unity® is a trademark of Unity Technologies.
Unity®은 Unity Technologies의 상표입니다.
iOS is a trademark of Apple, Inc.
iOS는 애플사의 상표입니다.
Overview 개요
The Google Play Games plugin for Unity allows you to access the Google Play Games API through Unity'ssocial interface.
이 유니티용 구글 플레이 게임 플러그인은 유니티의 소셜 인터페이스를 통해서 구글 플레이 게임 API에 접근할 수 있게 합니다.
The plugin provides support for the following features of the Google Play Games API:
easy GUI-oriented project setup (integrated into the Unity GUI)
쉬운 GUI기반 프로젝트 설정 (유니티 GUI에 통합되었습니다)
no need to override/customize the player Activity
플레이어 활동을 재정의 하거나 커스터마이즈할 필요가 없습니다.
no need to override/customize AndroidManifest.xml
AndroidManifest.xml를 재정의 하거나 커스터마이즈할 필요가 없습니다.
System requirements:
시스템 요구사항:
Unity® 5 or above.
유니티5 이상
To deploy on Android:
안드로이드에 배포하기 위해
Android SDK
안드로이드 SDK 필요
Android v4.0 or higher
안드로이드 버전 4 이상
Google Play Services library, version 11.6 or above
구글 플레이 서비스 라이브러리 버전 11.6 이상
Upgrading 업그레이드
If you have already integrated your project with a previous version of the plugin and wish to upgrade to a new version, please refer to theupgrade instructions.
만약 당신이 프로젝트에 이전 버전의 플러그인을 이미 통합했지만 새로운 버전으로 업그레이드하길 원한다면 업그레이드 안내서를 참고하세요.
Configure Your Game 게임 설정하기
To use the plugin, you must firstconfigure your gamein the Google Play Developer Console.
플러그인을 사용하기 위해서, 당신은 먼저 구글 플레이 개발자 콘솔에서 당신의 게임 환경을 설정 해야합니다.
Follow the instructions on creating a client ID.
클라이언트 ID 생성에 관한 안내를 따르세요.
Be particularly careful when entering your package name and your certificate fingerprints, since mistakes on those screens can be difficult to recover from.
당신의 패키지 이름과 당신의 인증서 지문을 입력할 때 특별히 주의하세요. 이러한 실수들은 복구하기 어려울 수 있습니다.
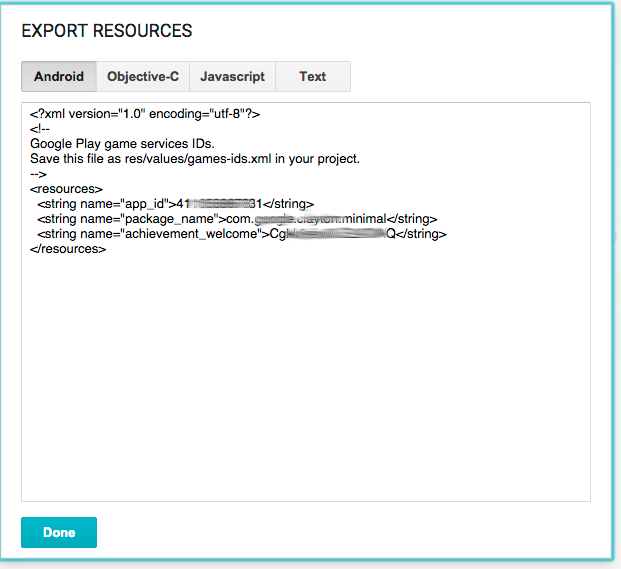
Copy the game resources from the console
콘솔로부터 게임 리소스들을 복사하세요.
Once you configure at least one resource (event, achievement, or leaderboard), copy the resource configuration from the Google Play Developer Console, and paste it into the setup configuration in Unity.
일단 당신이 하나 이상의 리소스(이벤트, 업적, 리더보드)를 구성하면, 리소스 구성을 구글 플레이 개발자 콘솔에서 복사하세요. 그리고 유니티의 설정 구성에 이것을 붙여 넣으세요.
To get the resources go to the Achievements tab, then click on "Get resources" on the bottom of the list.
자원을 얻으려면 업적 탭으로 가서, 목록 아래의 리소스 얻기를 누르세요.
Then click the "Android section".
그 다음 안드로이드 영역을 누르세요.
Select all the contents of the resources window, and copy them to the clipboard.
리소스 창의 모든 내용을 선택하고 클립보드에 복사하세요.
Paste the game resources into the plugin setup dialog
게임 리소스들을 플러그인 설정 다이얼로그에 붙여넣으세요.
Back in Unity, open the setup dialogWindow > Google Play Games > Setup... > Android Setup
유니티로 돌아가서, 설정 다이얼로그를 여세요.
Enter the directory to save constants- Enter the folder for the constants file.
상수들을 저장할 디렉터리를 입력하세요 - 상수 파일을 위한 폴더를 입력하세요.
Constants class name- this is the name of the C# class to create, including namespace.
상수 클래스 이름 - 이것은 만들 C# 클래스의 이름입니다.
Resources Definition- paste the resource data from the Play Games console here.
리소스 정의 - 플레이 게임 콘솔에서 가져온 리소스 데이터를 여기에 붙여넣으세요.
Web client ID- this is the client ID of the linked web app. It is only needed if you have a web-based backend for your game and need a server auth code to be exchanged for an access token by the backend server, or if you need an id token for the player to make other, non-game, API calls.
웹 클라이언트 ID - 이것은 연결된 웹 앱의 클라이언트 아이디입니다. 이건 당신이 게임을 위한 웹기반 백엔드를 가지고 있고 백엔드 서버와 엑세스 토큰을 교환하기 위한 서버 인증 코드가 필요한 경우, 또는 당신이 게임 외의 다른 API호출을 만드는 경우에 필요합니다.
The setup process will configure your game with the client id and generate a C# class that contains constants for each of your resources.
이 설정 과정은 클라이언트 아이디로 게임을 구성하고, 각 리소스의 상수를 포함하는 C#클래스를 생성합니다.
Setup Checklist 설정 체크리스트
Make sure to do the following if they are relevant to your game:
당신 게임과 관련이 있는경우 다음 작업을 수행하세요.
1. Add tester email addresses to the testing section of your game on the Play Games Console.
1. 당신의 플레이 게임 콘솔 테스팅 영역에 테스터 이메일 주소를 입력하세요.
2. The SHA1 fingerprint used to create the linked Android app is from the keystore used to sign the Unity application.
2. 연결된 안드로이드 앱을 만들기 위해 사용된 SHA1 지문은 유니티 앱에 서명하는데 사용되는 키스토어로부터 왔습니다.
For each achievement and leaderboard you configure, make sure to note the correspondingachievement IDorleaderboard ID, as those will be needed when making the API calls.
구성하는 업적과 리더보드를 위해, 업적 ID나 리더보드 ID를 적어두세요. 이것들은 API 호출을 작성할 때 필요합니다.
Achievement and leaderboard IDs are alphanumeric strings (e.g. "Cgkx9eiuwi8_AQ").
업적, 리더보드 아이디는 영문과 숫자의 조합으로 이루어져 있습니다.
Add Events
이벤트 추가
Events allow you to track user actions in your game and report on them with Analytics.
이벤트는 당신이 게임 속 유저의 활동을 추적할 수 있게 해줍니다. 그리고 그것들의 분석 자료를 만들 수 있게 해줍니다.
You should now see a new menu item was added underWindow > Google Play Games.
이제 당신은 Window > Google Play Games에 새 메뉴 아이템이 추가된걸 확인할 수 있습니다.
If you don't see the new menu items, refresh the assets by clickingAssets > Refreshand try again.
이 새로운 메뉴 아이템을 확인할 수 없다면, Assets > Refresh 를 눌러 에셋을 새로고침하고 다시 시도해보세요.
Android Setup
안드로이드 설정
Next, set up the path to your Android SDK installation in Unity.
다음, 안드로이드 SDK가 설치 경로를 유니티에 설정하세요.
This is located in the preferences menu, under theExternal Toolssection.
이것은 환경설정 메뉴의 External Tools 아래에 있습니다.
To configure your Unity game to run with Google Play Games on Android, first open the Android SDK manager and verify that you have downloaded the following packages.
당신의 유니티 게임을 안드로이드에서 구글 플레이 게임즈와 함께 실행시키기 위해 설정하려면, 먼저 안드로이드 SDK매니저를 열고 다음과 같은 패키지를 다운로드 했는지 확인하세요.
Depending on if you are using the SDK manager from Android Studio, or using the standalone SDK manager, the name of the components may be different.
안드로이드 스튜디오의 SDK매니저를 사용하는지, 독립형 SDK 매니저를 사용하는지에 따라 컴포넌트의 이름이 다를 수 있습니다.
Google Play Services
구글 플레이 서비스
Android Support Library
안드로이드 지원 라이브러리
Local Maven repository for Support Libraries (Also known as Android Support Repository)
지원 라이브러리를 위한 로컬 메이븐 저장소 (안드로이드 지원 저장소로도 불린다.)
Google Repository
구글 저장소
Android 6.0 (API 23) (this does not affect the min SDK version).
안드로이드 6.0 (최소 SDK버전에는 이것이 영향을 주지 않습니다.)
Next, configure your game's package name.
그 다음, 당신 게임의 패키지 이름을 구성하세요.
To do this, clickFile > Build Settings, select theAndroidplatform and clickPlayer Settingsto show Unity's Player Settings window.
구성하기 위해서 File > Build Settings을 클릭하고 안드로이드 플랫폼을 선택한 뒤 유니티의 플레이어 세팅 창을 보기위해 Player Settings를 누르세요.
In that window, look for theBundle Identifiersetting underOther Settings.
이 창에서, Other Settings 아래 Bundle Identifier을 찾으세요.
Enter your package name there (for examplecom.example.my.awesome.game).
그곳에 당신의 패키지 이름을 넣으세요.
In order to sign in to Play Game Services, you need to sign your APK file, make sure that you are signing it with the correct certificate, that is, the one that corresponds to the SHA1 certificate fingerprint you entered in the Developer Console during the setup.
플레이 게임 서비스에 로그인하기 위해서, 당신은 당신의 APK에 서명해야 합니다. 당신이 올바른 인증서로 서명하고 있는지 확인해야한다. 올바른 인증서란 설정 중에 개발자 콘솔에 입력된 SHA1인증서 지문을 말한다.
Next, click theWindow |Google Play Games|Setup - Android setupmenu item.
그 다음, Window |Google Play Games|Setup - Android setup 메뉴 아이템을 누르세요.
This will display the Android setup screen.
그러면 안드로이드 설정 화면이 보일 것 입니다.
Enter the Constants class name.
상수 클래스 이름을 입력하세요.
This is the name of the fully qualified class that will be updated (or created) which contains the IDs of the game resources.
이것은 충분한 권한을 가진 클래스의 이름입니다. 게임 리소스의 아이디가 포함된 이 클래스는 업데이트되거나 혹은 생성 될 것입니다.
The format of the name is .. For example,AwesomeGame.GPGSIds
그 이름의 형식은 다음과 같습니다. AwesomeGame.GPGSIds
Paste the resource definition data.
리소스 정의 데이터를 붙여넣으세요.
This is the XML data from the Google Play Developer Console which contains the resource IDs as well as the Application ID for Android.
이것은 XML 데이터 입니다. 이 데이터는 구글 플레이 개발자 콘솔에서 왔습니다. 이 데이터는 리소스 아이디와 안드로이드를 위한 앱 ID를 포함합니다.
This data is found in the Google Play Developer Console by clicking "Get resources" on any of the resource pages (e.g. Achievements or Leaderboards), then clicking Android.
구글 개발자 콘솔의 리소스페이지에서 Get resources를 누른뒤 안드로이드를 누르면 이 데이터를 볼 수 있습니다.
After pasting the data into the text area, click theSetupbutton.
이 데이터를 텍스트 영역에 붙여넣은 후 설정 버튼을 누르세요.
Note:If you are using a web application or backend server with your game, you can link the web application to the game to enable getting the player's id token and/or email address.
주의: 만약 당신이 웹 애플리케이션이나 백엔드 서버를 게임에서 사용하고 있다면, 당신은 플레이어의 ID토큰이나 플레이어의 이메일 주소를 가져올 수 있도록 웹 애플리케이션을 게임과 연결할 수 있습니다.
To do this, link a web application to the game in the Google Play Developer Console, and enter the client id for the web application into the setup dialog.
그렇게 하기 위해, 구글 플레이 개발자 콘솔의 게임에 웹 애플리케이션을 연결하세요. 그리고 웹 애플리케이션의 클라이언트 ID를 설정 다이얼로그에 입력하세요.
Additional instructions on building for Android on Windows
윈도우에서 안드로이드용으로 빌드하기 위한 추가적 안내.
If you are using Windows, you must make sure that your Java SDK installation can be accessed by Unity. To do this:
당신이 윈도우를 사용하고 있다면, 당신은 자바 SDK에 유니티가 접근할 수 있는지 확인해야 합니다. 다음과 같이 하세요.
1.Set the JAVA_HOME environment variable to your Java SDK installation path (for example,C:\Program Files\Java\jdk1.7.0_45).
1. JAVA_HOME 환경 변수를 자바 설치 경로로 설정하세요.
2.Add the Java SDK'sbinfolder to yourPATHenvironment variable (for example,C:\Program Files\Java\jdk1.7.0_45\bin)
2. 자바 SDK의 bin폴더를 PATH 환경 변수에 추가하세요.
3.Reboot.
3. 재부팅 하세요.
How to edit environment variables:
환경변수를 수정하는 방법:
In Windows 2000/XP/Vista/7, right-clickMy Computer, thenProperties, then go toAdvanced System Properties(orSystem Propertiesand then click theAdvancedtab), then clickEnvironment Variables.
윈도우 7이하 에서는 내 컴퓨터를 우클릭한 후 설정에 들어가서 고급 시스템 설정으로 가서 환경변수를 클릭합니다.
On Windows 8, pressWindows Key + Wand search forenvironment variables
윈도우 8에서는 윈도우키와 W를 함께 누르고 환경변수를 검색하세요.
For more information, consult the documentation for your version of Windows.
더 많은 정보는 윈도우 버전별 문서를 참고하세요.
Run the Project
프로젝트 실행
If you are working with theMinimalsample, you should be able to build and run the project at this point.
만약 최소 샘플로 작업하고 있다면, 지금부터 빌드와 실행이 가능합니다.
You will see a screen with anAuthenticatebutton, and you should be able to sign in when you click it.
당신은 인증 버튼을 화면에서 볼 수 있을 것입니다. 그리고 그 버튼을 클릭했을 때 로그인이 가능합니다.
To build and run on Android, clickFile > Build Settings, select theAndroidplatform, thenSwitch to Platform, thenBuild and Run.
안드로이드에서 빌드하고 실행시키기 위해서, 파일 > 빌드 설정을 클릭하고 안드로이드 플랫폼을 선택하세요. 그리고 플랫폼을 변경하고 빌드하고 실행시키세요.
ISocialPlatform Compliance
ISocialPlatform 준수
The Google Play Games plugin implements Unity'ssocial interface, for compatibility with games that already use that interface when integrating with other platforms.
구글 플레이 게임 플러그인은 이미 다른 플랫폼과 통합된 게임들과의 호환성을 위해 유니티의 소셜 인터페이스를 구현했습니다.
However, some features are unique to Play Games and are offered as extensions to the standard social interface provided by Unity.
그러나 몇몇 기능들은 플레이 게임에서만 존재하며 유니티가 제공한 표준 소셜 인터페이스의 확장으로 제공됩니다.
The standard API calls can be accessed through theSocial.Activeobject, which is a reference to anISocialPlatforminterface.
표준 API 호출은 Social.Active 객체를 통해서 접근이 가능합니다. 이 객체는 ISocialPlatform 인터페이스의 참조입니다.
The non-standard Google Play Games extensions can be accessed by casting theSocial.Activeobject to thePlayGamesPlatformclass, where the additional methods are available.
비 표준 구글 플레이 게임 확장들은 Social.Active객체를 PlayGamesPlatform 클래스로 캐스팅 하여 접근할 수 있습니다. PlayGamesPlatform 클래스는 추가 메소드 사용이 가능합니다.
Nearby Connections Configuration
근접 통신 설정
In order to use nearby connections, a service id which uniquely identifies the set of applications that can interact needs to be configured.
근접 통신을 사용하기 위해서, 상호 작용이 가능한 어플리케이션의 유일한 서비스 아이디가 설정되어야 합니다.
This is done by clicking theWindow > Google Play Games > Nearby Connections setup...menu item.
Window > Google Play Games > Nearby Connections setup을 눌러서 설정이 가능합니다.
This will display the nearby connections setup screen.
그럼 근접 통신 설정 화면이 보일 것 입니다.
On this screen enter the service ID you want to use.
이 화면에서 사용할 서비스 ID를 입력하세요.
It should be something that identifies your application, and follows the same rules as the bundle id (for example: com.example.myawesomegame.nearby).
이 아이디는 당신의 어플리케이션을 식별할 수 있게 해야 합니다. 그리고 번들 ID와 같은 룰을 따라야 합니다.
Once you enter the id, pressSetup.
아이디를 입력하고 설정을 누르세요.
To use nearby connections, the player does not need to be authenticated, and no Google Play Developer Console configuration is needed.
근접 통신을 사용하기 위해서, 플레이어는 인증이 필요하지 않습니다. 그리고 구글 플레이 개발자 콘솔 설정도 필요하지 않습니다.
For detailed information on nearby connection usage, please refer tonearby connections.
더 자세한 정보는 근접통신 링크를 참조하세요.
Configuration & Initialization Play Game Services
플레이 게임 서비스 구성 및 초기화
In order to save game progress, handle multiplayer invitations and turn notifications, or require access to a player's Google+ social graph, the default configuration needs to be replaced with a custom configuration.
게임 진행을 저장하고, 플레이어를 초대하고 알림을 보내려면 또는 플레이어의 구글 소셜 그래프에 접근 권한을 얻으려면, 기본 설정을 맞춤 구성으로 바꿔야 합니다.
To do this use thePlayGamesClientConfiguration.
그러기 위해서 PlayGamesClientConfiguration을 사용하세요.
If your game does not use these features, then there is no need to initialize the platform configuration.
당신의 게임이 이러한 기능을 사용하지 않는다면, 플랫폼 구성이 필요하지 않습니다.
Once the instance is initialized, make it your default social platform by callingPlayGamesPlatform.Activate:
이 인스턴스가 초기화 되면, PlayGamesPlatform.Activatef를 호출해서 이것을 기본 소셜 플랫폼으로 만듭니다:
    using GooglePlayGames;
    using GooglePlayGames.BasicApi;
    using UnityEngine.SocialPlatforms;

    PlayGamesClientConfiguration config = new PlayGamesClientConfiguration.Builder()
        // enables saving game progress.
        //게임 진행상황 저장기능 활성화
        .EnableSavedGames()
        // registers a callback to handle game invitations received while the game is not running.
        //콜백 등록. 게임 실행중이 아닌경우 게임 초대 처리하기 위함.
        .WithInvitationDelegate(<callback method>)
        // registers a callback for turn based match notifications received while the
        // game is not running.
        //콜백 등록. 게임이 실행되지 않는동안 수신한 턴기반 게임을 위한 콜백.
        .WithMatchDelegate(<callback method>)
        // requests the email address of the player be available.
        // Will bring up a prompt for consent.
        //플레이어의 이메일 주소를 사용할 수 있도록 요청한다.
        //동의를 위한 메시지가 나타난다.
        .RequestEmail()
        // requests a server auth code be generated so it can be passed to an
        //  associated back end server application and exchanged for an OAuth token.
        //서버 인증 코드가 백엔드 서버 애플리케이션으로 전달되고
        //OAuth token을 교환할 수 있도록 서버 인증 코드 생성을 요청합니다.
        .RequestServerAuthCode(false)
        // requests an ID token be generated.  This OAuth token can be used to
        //  identify the player to other services such as Firebase.
        //아이디 토큰이 생성되도록 요청합니다. 이 OAuth 토큰은 파이어베이스 같은 다른 서비스에서
        //사용자를 식별하기 위해 사용됩니다.
        .RequestIdToken()
        .Build();

    PlayGamesPlatform.InitializeInstance(config);
    // recommended for debugging:
    //디버깅을 위해 추천됩니다.
    PlayGamesPlatform.DebugLogEnabled = true;
    // Activate the Google Play Games platform
    // 구글 플레이 게임 플랫폼을 활성화 합니다.
    PlayGamesPlatform.Activate();
After activated, you can access the Play Games platform throughSocial.Active.
활성화 한뒤, 당신은 Social.Active를 통해서 플레이 게임 플랫폼에 접근할 수 있습니다.
You should only callPlayGamesPlatform.Activateonce in your application.
Note: adding additional scopes with most likely require user consent when starting your game.
주의: 추가적인 영역을 추가하면 게임 시작시 사용자 동의가 요구됩니다.
Sign in
로그인
To sign in, callSocial.localUser.Authenticate, which is part of the standard Unity social platform interface.
로그인 하기위해, Social.localUser.Authenticate을 호출하세요. 이것은 표준 유니티 소셜 플랫폼 인터페이스의 일부입니다.
    using GooglePlayGames;
    using UnityEngine.SocialPlatforms;
    ...
    // authenticate user:
    //유저 인증
    Social.localUser.Authenticate((bool success) => {
        // handle success or failure
        //성공이나 실패 처리
    });
Authentication will show the required consent dialogs.
인증에 필요한 동의 다이얼로그가 표시됩니다.
If the user has already signed into the game in the past, this process will be silent and the user will not have to interact with any dialogs.
// 유저가 이미 과거에 게임에 가입했다면, 이 절차는 생략될 것입니다. 그리고 유저는 어떤 다이얼로그와도 상호작용하지 않아도 됩니다.
Note that you cannot make any games API calls (unlock achievements, post scores, etc) until you get a successful return value fromAuthenticate, so it is good practice to put up a standby screen until the callback is called, to make sure the user can't start playing the game until the authentication process completes.
당신이 인증으로부터 성공 리턴값을 받기 전까지 당신은 게임 API 호출을 할 수 없음을 기억하세요.
그래서 콜백이 호출 될때까지 대기화면을 띄워두는 것이 좋습니다.
유저는 게임을 시작할 수 없습니다. 인증 절차가 완료될때까지
Player Statistics
플레이어 통계
The Player Stats API let you tailor game experiences to specific segments of players and different stages of the player lifecycle.
플레이어 통계 API는 당신이 재단할 수 있게 해줍니다. 게임 경험을 사용자별 분류에 따라 그리고 플레이어 수명주기에 따라 다른 스테이지로 나눌 수 있습니다.
You can build tailored experiences for each player segment based on how players are progressing, spending, and engaging.
당신은 맞춤형 경험을 구축할 수 잇습니다. 각각의 플레이어 분류에 따라, 얼마나 플레이어가 진행했는지, 소모했는지, 참여했는지 기준으로.
For example, you can use this API to take proactive actions to encourage a less active player to re-engage with your game, such as by displaying and promoting new in-game items when the player signs in.
예를 들어, 당신은 이 API를 사용할 수 있습니다. 능동적 액션을 취하는데 사용할 수 있습니다. 적은 활동 플레이어가 게임에 다시 참여할 수 있도록. 사용자가 로그인 할 때 새로운 게임아이템을 보여주고 프로모션함으로 써.
The callback takes two parameters:
콜백에는 두가지 파라미터가 필요합니다.
1.The result code less than or equal to zero is success. SeeCommonStatusCodesfor all values.
1.결과 코드가 0보다 작거나 같으면 성공입니다. CommonStatusCodes에서 전체 값을 확인하세요.
2.The PlayerStats object of type GooglePlayGames.PlayGamesLocalUser.PlayerStats
2.GooglePlayGames.PlayGamesLocalUser.PlayerStats유형의 사용자 통계객체
The player stats are available after authenticating:
인증 후 사용자 통계를 사용할 수 있습니다.
    ((PlayGamesLocalUser)Social.localUser).GetStats((rc, stats) =>
        {
            // -1 means cached stats, 0 is succeess
            //-1은 캐시된 상태를 의미한다. 0은 성공이다.
            // see  CommonStatusCodes for all values.
            //CommonStatusCodes를 보라 전체 값을 위해.
            if (rc <= 0 && stats.HasDaysSinceLastPlayed()) {
                Debug.Log("It has been " + stats.DaysSinceLastPlayed + " days");
            }
        });
Setting popup gravity
설정 팝업 중력 설정
You can set the gravity used by popups when showing game services elements such as achievement notificartions.
업적이나 알림같은 게임서비스 요소를 팝업으로 띄울 때 사용되는 중력을 설정할 수 있습니다.
The default is TOP.
기본값은 TOP입니다.
This can only be set after authentication. For example:
이것은 인증 후 설정될 수 있습니다. 예를 들어:
    Social.localUser.Authenticate((bool success) =>
                {
                    if (success)
                    {
                        ((GooglePlayGames.PlayGamesPlatform)Social.Active).SetGravityForPopups(Gravity.BOTTOM);
                    }
                });
Revealing/Unlocking an Achievement
업적 공개/ 해제
To unlock an achievement, use theSocial.ReportProgressmethod with a progress value of 100.0f:
업적을 해제하기위해, Social.ReportProgress 메소드를 사용하세요. 진행 값 100.0f가 되면 업적이 해제됩니다.
    using GooglePlayGames;
    using UnityEngine.SocialPlatforms;
    ...
    // unlock achievement (achievement ID "Cfjewijawiu_QA")
    // 업적 언락( 업적 아이디 입력)
    Social.ReportProgress("Cfjewijawiu_QA", 100.0f, (bool success) => {
      // handle success or failure
      //성공, 실패 처리
    });
Notice that according to the expected behavior ofSocial.ReportProgress, a progress of 0.0f means revealing the achievement and a progress of 100.0f means unlocking the achievement.
Social.ReportProgress의 예상되는 행동에 따르면, 0.0의 진행이 의미하는 것은 업적을 공개하는 것이고, 100.0f의 의미는 업적을 해제하는 것이다.
Therefore, to reveal an achievement (that was previously hidden) without unlocking it, simply call Social.ReportProgress with a progress of 0.0f.
그러므로, 숨겨져있던 업적을 공개하기 위해서, 0.0f로 호출하면 된다.
Incrementing an Achievement
업적 증가
If your achievement is incremental, the Play Games implementation ofSocial.ReportProgresswill try to behave as closely as possible to the expected behavior according to Unity's social API, but may not be exact.
당신의 업적이 증가하면, Social.ReportProgress의 플레이 게임 구현은 유니티의 소셜 API에 따라 가능한 예상대로 작동하려 합니다. 그러나 정확하지 않을 수 있습니다.
For this reason, we recommend that you do not use Social.ReportProgress for incremental achievements.
이러한 이유로, 우리는 다음을 추천합니다. 당신이 Social.ReportProgress를 사용하지 않기를.. 업적 증가를 위해
Instead, use thePlayGamesPlatform.IncrementAchievementmethod, which is a Play Games extension.
대신, 사용하세요 PlayGamesPlatform.IncrementAchivement 함수를. 이것은 플레이 게임이 만든 확장입니다.
    using GooglePlayGames;
    using UnityEngine.SocialPlatforms;
    ...
    // increment achievement (achievement ID "Cfjewijawiu_QA") by 5 steps
    //업적 5 상승
    PlayGamesPlatform.Instance.IncrementAchievement(
        "Cfjewijawiu_QA", 5, (bool success) => {
            // handle success or failure
            //성공 실패 처리
    });
Posting a Score to a Leaderboard
리더보드에 점수 포스트하기
To post a score to a leaderboard, callSocial.ReportScore.
리더보드에 점수를 포스트하기 위해. Social.ReportScore를 호출하세요.
    using GooglePlayGames;
    using UnityEngine.SocialPlatforms;
    ...
    // post score 12345 to leaderboard ID "Cfji293fjsie_QA")
    //리더보드에 12345 점수를 포스트 합니다.
    Social.ReportScore(12345, "Cfji293fjsie_QA", (bool success) => {
        // handle success or failure
        // 결과 처리합니다.
    });
To post a score and include a metadata tag use the Play Game Services instance directly:
점수를 포스팅하고 메타 태그를 포함하려면, 직접 플레이 게임 서비스 인스턴스를 사용하세요:
    using GooglePlayGames;
    using UnityEngine.SocialPlatforms;
    ...
    // post score 12345 to leaderboard ID "Cfji293fjsie_QA" and tag "FirstDaily")
    // 점수를 포스팅하고 태그합니다.
    Social.ReportScore(12345, "Cfji293fjsie_QA", "FirstDaily", (bool success) => {
        // handle success or failure
    });
Note that the platform and the server will automatically discard scores that are lower than the player's existing high score, so you can submit scores freely without any checks to test whether or not the score is greater than the player's existing score.
플랫폼과 서버는 자동적으로 과거의 낮은 점수를 삭제합니다. 그래서 당신은 점수를 자유롭게 제출할 수 있습니다. 점수가 기존에비해 높은지 낮은지에 대한 어떤 검사도 필요없습니다.
Showing the Achievements UI
업적 UI 보여주기
To show the built-in UI for all achievements, callSocial.ShowAchievementsUI.
모든 업적을 위해 기본제공 UI를 보여주려면, Social.ShowAchievementsUI를 호출하세요.
    using GooglePlayGames;
    using UnityEngine.SocialPlatforms;
    ...
    // show achievements UI
    Social.ShowAchievementsUI();
Showing the Leaderboard UI
리더보드 UI 보여주기
To show the built-in UI for all leaderboards, callSocial.ShowLeaderboardUI.
기본제공 리더보드UI를 보여주기 위해서, Social.ShowLeaderboardUI를 호출하세요.
    using GooglePlayGames;
    using UnityEngine.SocialPlatforms;
    ...
    // show leaderboard UI
    Social.ShowLeaderboardUI();
If you wish to show a particular leaderboard instead of all leaderboards, you can pass a leaderboard ID to the method.
당신이 전체 리더보드가 아닌 특정 리더보드를 보여주길 원한다면, 당신은 메소드에 리더보드 아이디를 보낼 수 있습니다.
This, however, is a Play Games extension, so the Social.Active object needs to be cast to a PlayGamesPlatform object firs:
그러나, 이것은 플레이 게임 확장입니다. 그래서 Social.Active 객체를 PlayGamesPlatform 객체로 먼저 캐스팅하는 것이 필요합니다.:
    using GooglePlayGames;
    using UnityEngine.SocialPlatforms;
    ...
    // show leaderboard UI
    PlayGamesPlatform.Instance.ShowLeaderboardUI("Cfji293fjsie_QA");
Accessing Leaderboard data
리더보드 데이터 접근
There are 2 methods to retrieving the leaderboard score data.
리더보드 점수 데이터 검색을 위한 두가지 메소드가 있습니다.
Using Social.ILeaderboard
Social.ILeaderboard 사용
This method uses the ILeaderboard interface to define the scope and filters for getting the data.
이 메소드는 데이터를 얻기 위한 범위와 필터를 정의하기 위해 ILeaderboard 인터페이스를 사용합니다.
This approach allows you to configure:
이 방법은 당신이 구성하도록 합니다:
The leaderboard Id
The collection (social or public)
The timeframe (daily, weekly, all-time)
The rank position to start retrieving scores.
The number of scores (the default is 25).
Filter by user id.
리더보드 ID
콜렉션(소셜, 오픈)
시간대
점수 검색 시작을 위한 위치
점수 값
유저 ID 필터
If the from parameter is non-positive, then the results returned are player-centered, meaning the scores around the current player's score are returned.
파라미터가 음수라면, 결과는 플레이어 중심이며, 현재 플레이어 점수와 가까운 점수가 표시됩니다.
Each score has the userId of the player that made the score.
각 점수는 점수를 만든 플레이어의 아이디를 가지고 있다.
You can useSocial.LoadUsers()to load the player profile.
당신은 플레이어의 프로필을 불러오기위해 Social.LoadUsers()를 사용할 수 있다.
Remember that the contents of the player profile are subject to privacy settings of the players.
플레이어 프로필의 내용은 플레이어 개인 설정에 따르는 것을 기억하세요.
    internal void LoadUsersAndDisplay(ILeaderboard lb)
    {
        // get the user ids
        // 유저의 아이디들을 얻으세요
        List<string> userIds = new List<string>();

        foreach(IScore score in lb.scores) {
            userIds.Add(score.userID);
        }
        // load the profiles and display (or in this case, log)
        // 프로필들을 불러오고 보여주세요.
        Social.LoadUsers(userIds.ToArray(), (users) =>
            {
                string status = "Leaderboard loading: " + lb.title + " count = " +
                    lb.scores.Length;
                foreach(IScore score in lb.scores) {
                    IUserProfile user = FindUser(users, score.userID);
                    status += "\n" + score.formattedValue + " by " +
                        (string)(
                            (user != null) ? user.userName : "**unk_" + score.userID + "**");
                }
                Debug.log(status);
            });
    }
Recording Events
이벤트 기록하기
Incrementing an event is very simple, just call the following method:
이벤트를 증가시키는 것은 매우 쉽다. 단지 아래의 메소드를 호출하면 된다.
    using GooglePlayGames;
    ...
    // Increments the event with Id "YOUR_EVENT_ID" by 1
    //이벤트를 1만큼 증가시킨다.
    PlayGamesPlatform.Instance.Events.IncrementEvent("YOUR_EVENT_ID", 1);
This call is "fire and forget", it will handle batching and execution for you in the background.
이것은 "불내고 잊는다"로 불립니다. 이것은 백그라운드에서 배치하고 실행하는 것을 다룹니다.
Saving Game State to the Cloud
클라우드에 게임 상태 저장
For details on saved games concepts and APIs please refer to thedocumentation.
게임 저장 개념과 API에 대한 자세한 정보는 이 문서를 참고하세요.
To enable support for saved games, the plugin must be initialized with saved games enabled by callingPlayGamesPlatform.InitializeInstance:
게임 저장 지원을 활성화 하기 위해, 플러그인은 PlayGamesPlatform.InitializeInstance을 호출하여 활성화하고 초기화되어야 합니다.
    PlayGamesClientConfiguration config = new PlayGamesClientConfiguration.Builder()
        // enables saving game progress.
        // 게임 진행 저장 활성화
        .EnableSavedGames()
        .Build();
    PlayGamesPlatform.InitializeInstance(config);
Displaying saved games UI
저장된 게임 UI 표시하기
The standard UI for selecting or creating a saved game entry is displayed by calling:
In order to read or write data to a saved game, the saved game needs to be opened.
저장된 게임의 데이터를 읽거나 쓰기 위해서, 저장된 게임이 열려야합니다.
Since the saved game state is cached locally on the device and saved to the cloud, it is possible to encounter conflicts in the state of the saved data.
저장된 데이터의 상태는 디바이스에 캐쉬되어있고, 클라우드에 저장되어 있기에, 저장된 데이터의 상태가 충돌하는 것이 가능하다.
A conflict happens when a device attempts to save state to the cloud but the data currently on the cloud was written by a different device.
충돌은 디바이스가 클라우드에 저장하려고 시도하는데 현재 데이터는 다른 디바이스에서 기록되었을 때 발생합니다.
These conflicts need to be resolved when opening the saved game data.
이 충돌은 저장된 게임 데이터를 열 때 해결이 필요합니다.
There are 2 open methods that handle conflict resolution, the firstOpenWithAutomaticConflictResolutionaccepts a standard resolution strategy type and automatically resolves the conflicts.
충돌 해결할 두가지 오픈 메소드가 있습니다. 먼저 OpenWithAutomaticConflictResolution는 표준 해결 전략 유형을 받아들입니다. 그리고 자동적으로 충돌을 해결합니다.
The other method,OpenWithManualConflictResolutionaccepts a callback method to allow the manual resolution of the conflict.
다른 메소드OpenWithManualConflictResolution는 수동으로 충돌을 해결할 콜백 메소드를 수용합니다.
SeeGooglePlayGames/BasicApi/SavedGame/ISavedGameClient.csfor more details on these methods.
이 메소드들의 더 자세한 정보는 GooglePlayGames/BasicApi/SavedGame/ISavedGameClient.cs를 참고하세요.
Once the saved game file is opened, it can be written to save the game state.
저장된 게임 파일이 열리면, 게임 상태를 저장하는 것이 가능합니다.
This is done by callingCommitUpdate.
CommitUpdate을 호출함으로써 이것을 할 수 있습니다.
There are four parameters to CommitUpdate:
CommitUpdate를 위한 파라미터가 4개 있습니다:
the saved game metadata passed to the callback passed to one of the Open calls.
the updates to make to the metadata.
the actual byte array of data
a callback to call when the commit is complete.
콜백에 전달된 저장된 게임 메타데이터
메타데이터를 만드는 업데이트들
데이터의 실제 바이트 배열
커밋이 완료되었을 때 호출할 콜백
    void SaveGame (ISavedGameMetadata game, byte[] savedData, TimeSpan totalPlaytime) {
        ISavedGameClient savedGameClient = PlayGamesPlatform.Instance.SavedGame;

        SavedGameMetadataUpdate.Builder builder = new SavedGameMetadataUpdate.Builder();
        builder = builder
            .WithUpdatedPlayedTime(totalPlaytime)
            .WithUpdatedDescription("Saved game at " + DateTime.Now());
        if (savedImage != null) {
            // This assumes that savedImage is an instance of Texture2D
            // and that you have already called a function equivalent to
            // getScreenshot() to set savedImage
            // NOTE: see sample definition of getScreenshot() method below
            byte[] pngData = savedImage.EncodeToPNG();
            builder = builder.WithUpdatedPngCoverImage(pngData);
        }
        SavedGameMetadataUpdate updatedMetadata = builder.Build();
        savedGameClient.CommitUpdate(game, updatedMetadata, savedData, OnSavedGameWritten);
    }

    public void OnSavedGameWritten (SavedGameRequestStatus status, ISavedGameMetadata game) {
        if (status == SavedGameRequestStatus.Success) {
            // handle reading or writing of saved game.
        } else {
            // handle error
        }
    }

    public Texture2D getScreenshot() {
        // Create a 2D texture that is 1024x700 pixels from which the PNG will be
        // extracted
        Texture2D screenShot = new Texture2D(1024, 700);

        // Takes the screenshot from top left hand corner of screen and maps to top
        // left hand corner of screenShot texture
        screenShot.ReadPixels(
            new Rect(0, 0, Screen.width, (Screen.width/1024)*700), 0, 0);
        return screenShot;
    }
Reading a saved game
저장된 게임 읽기
Once the saved game file is opened, it can be read to load the game state. This is done by callingReadBinaryData.
저장된 게임을 열면, 게임상태를 불러오기 위해 읽을 수 있습니다. ReadBinaryData을 호출해서 이것을 할 수 있습니다.
    void LoadGameData (ISavedGameMetadata game) {
        ISavedGameClient savedGameClient = PlayGamesPlatform.Instance.SavedGame;
        savedGameClient.ReadBinaryData(game, OnSavedGameDataRead);
    }

    public void OnSavedGameDataRead (SavedGameRequestStatus status, byte[] data) {
        if (status == SavedGameRequestStatus.Success) {
            // handle processing the byte array data
        } else {
            // handle error
        }
    }
Deleting a saved game
저장된 게임 삭제하기
Once the saved game file is opened, it can be deleted. This is done by callingDelete.
저장된 게임이 열린 상태에서, 삭제될 수 있습니다. Delete를 호출해서 수행됩니다.
    void DeleteGameData (string filename) {
        // Open the file to get the metadata.
        ISavedGameClient savedGameClient = PlayGamesPlatform.Instance.SavedGame;
        savedGameClient.OpenWithAutomaticConflictResolution(filename, DataSource.ReadCacheOrNetwork,
            ConflictResolutionStrategy.UseLongestPlaytime, DeleteSavedGame);
    }

    public void DeleteSavedGame(SavedGameRequestStatus status, ISavedGameMetadata game) {
        if (status == SavedGameRequestStatus.Success) {
            ISavedGameClient savedGameClient = PlayGamesPlatform.Instance.SavedGame;
            savedGameClient.Delete(game);
        } else {
            // handle error
        }
    }
Retrieving server authentication codes
서버 인증 코드 받기
In order to access Google APIs on a backend web server on behalf of the current player, you need to get an authentication code from the client application and pass this to your web server application.
현재 플레이어 대신 백엔드 웹서버에서 구글 API에 접근하려면, 당신은 클라이언트 애플리케이션에서 인증코드를 받아오고 이것을 웹서버 애플리케이션에 전송해야한다.
This code can then be exchanged for an access token to make calls to the various APIs.
Configure the web client Id of the web application linked to your game in the Play Game Console.
CallPlayGamesClientConfiguration.Builder.RequestServerAuthCode(false)when creating the configuration.
CallPlayGamesPlatform.Instance.GetServerAuthCode()once the player is authenticated.
Pass this code to your server application.
웹 애플리케이션의 웹 클라이언트 아이디를 설정해야합니다. 웹 클라이언트 아이디는 플레이 게임 콘솔에서 당신의 게임에 연결된 것을 말합니다.
그 구성을 만들때 PlayGamesClientConfiguration.Builder.RequestServerAuthCode(false)을 호출하세요.
플레이어가 인증되면 PlayGamesPlatform.Instance.GetServerAuthCode()를 호출하세요
이 코드를 당신의 서버로 보내세요
Getting another server auth code after exchanging the first code
처음 코드를 교환한 후 다른 서버 인증 코드를 받아오기
If your back end server interactions requires you to send a server auth code more than once per authenticated session, you can callPlaPlayGamesPlatform.Instance.GetAnotherServerAuthCode(Action<string> callback)
당신의 백엔드 서버가 인증된 세션당 두번 이상 서버에 보내는 것이 필요하다면, 당신은 PlaPlayGamesPlatform.Instance.GetAnotherServerAuthCode(Action<string> callback)를 호출할 수 있습니다.
This method requires the player to be aready authenticated and correctly configured to request server auth codes on this client.
이 메소드는 플레이어를 인증하고 클라이언트에서 서버 인증 코드를 요청하도록 올바르게 구성되어야 합니다.
This method is implemented by calling Google Sign-in silently which returns a new server auth code when already signed in.
이 메소드는 구글 로그인을 호출함으로 구현됩니다. 이미 로그인 되어있을 때 새로운 서버 인증 코드를 구글 로그인은 반환합니다.
Retrieving player's email
플레이어 이메일 조회
In order to access the player's email address:
플레이어의 이메일에 접근하기 위해서:
CallPlayGamesClientConfiguration.Builder.RequestEmail()when creating the configuration.
Access the email property((PlayGamesLocalUser) Social.localUser).Emailafter the player is authenticated.
구성을 만들 때 PlayGamesClientConfiguration.Builder.RequestEmail()를 호출해야 합니다.
플레이어가 이메일을 인증한 뒤, 이메일 설정에 접근하세요
Note:If all that is needed is a persistent unique identifier for the player, then you should use the player's id.
주의: 필요한 모든것이 플레이어의 영구적인 유일 식별자인 경우, 플레이어의 아이디를 사용해야합니다.
This is a unique ID specific to that player and is the same value all the time.
이것은 유일한 ID입니다. 그리고 플레이어를 특정하고 항상 같은 값입니다.
Retrieving player's ID Token
플레이어 ID 토큰 조회
To get the player's OAuth ID token:
플레이어의 OAuth ID 토큰을 얻기 위해:
CallPlayGamesClientConfiguration.Builder.RequestIdToken()when creating the configuration.
Access the idtoken property((PlayGamesLocalUser) Social.localUser).GetIdToken()after the player is authenticated.
구성을 생성할 때 PlayGamesClientConfiguration.Builder.RequestIdToken()를 호출하세요
플레이어가 인증한 뒤 id 토큰 속성에 접근하세요.
Note:The ID Token can be used to identify the real player identity.
주의: 아이디 토큰은 실제 플레이어 식별에 사용될 수 있습니다.
As a result requesting the ID Token will cause a consent screen to be presented to the user during login.
아이디 토큰을 요청하면 로그인 하고있는 유저에게 승인 화면을 보여줍니다.
Loading Friends
친구 가져오기
To load the friends of the current player, you can use the ISocial framework. This call is asynchronous, so the friends need to be processed in the callback.
현재 플레이어의 친구를 가져오기위해, 당신은 ISocial framework를 사용할 수 있다. 이 호출은 비동기이다. 그래서 친구는 콜백에서 처리가 필요하다.
Social.localUser.LoadFriends((ok) =>  {
    Debug.Log("Friends loaded OK: " + ok));
    foreach(IUserProfile p in Social.localUser.friends) {
         Debug.Log(p.userName + " is a friend");
    }
});
To sign the user out, use thePlayGamesPlatform.SignOutmethod.
유저를 로그아웃 하기 위해서, PlayGamesPlatform.SignOut 메소드를 사용하세요.
    using GooglePlayGames;
    using UnityEngine.SocialPlatforms;

    // sign out
    PlayGamesPlatform.Instance.SignOut();
After signing out, no further API calls can be made until the user authenticates again.
로그아웃 한뒤, 더이상의 API 호출은 다시 유저가 인증하기전에 생기지 않는다.
Decreasing apk size
앱 사이즈 줄이기
It is possible to decrease the size of the Play Games Services Unity Plugin by removing code for the Play Games Services features that your game doesn’t use by using Proguard. Proguard will remove the Play Games Unity plugin code for features that are not used in your game, so your game ships with only the code that is needed and minimizes the size impact of using Play Games Services.
Additionally, it is possible to reduce the size of the entire Unity project using Unity’sManaged Code Stripping, which will compress your entire project. This can be used in conjunction with Proguard.
Play Games Services Proguard configuration
Go toFile > Build Settings > Player Settingsand clickPublishing Settingssection. ChooseProguardforMinify > Release. Then, enableUser Proguard File. If you want the plugin to be proguarded for debug apks as well, you can chooseProguardforMinify > Debug.
(Advanced) Using the Plugin Without Overriding the Default Social Platform
When you callPlayGamesPlatform.Activate, Google Play Games becomes your default social platform implementation, which means that static calls to methods inSocialandSocial.Activewill be carried out by the Google Play Games plugin. This is the desired behavior for most games using the plugin.
However, if for some reason you wish to keep the default implementation accessible (for example, to use it to submit achievements and leaderboards to a different social platform), you can use the Google Play Games plugin without overriding the default one. To do this:
Do not callPlayGamesPlatform.Activate
IfXyzis the name of a method you wish to call on theSocialclass, do not callSocial.Xyz. Instead, callPlayGamesPlatform.Instance.Xyz
Do not useSocial.Activewhen interacting with Google Play Games. Instead, usePlayGamesPlatform.Instance.
That way, you can even submit scores and achievements simultaneously to two or more social platforms:
// Submit achievement to original default social platformSocial.ReportProgress("MyAchievementIdHere", 100.0f, callback); // Submit achievement to Google PlayPlayGamesPlatform.Instance.ReportProgress("MyGooglePlayAchievementIdHere", 100.0f, callback);
Special Thanks
This section lists people who have contributed to this project by writing code, improving documentation or fixing bugs.
Dgizussefor figuring out that setting JAVA_HOME is necessary on Windows.
antonlichtfor fixing a bug with the parameter type of showErrorDialog on the support library.
pR0Psfor fixing an issue where OnAchievementsLoaded was not accepting an OPERATION_DEFERRED result code as a success.
friikyeufor helping debugan issuethat caused API calls to be queued up rather than executed even when connected.